
Multi-Purpose Room Resources
Audio and Video:
1.) Home Screen
Press this to turn the iPad on. The iPad will automatically open the projector and turn on the program.
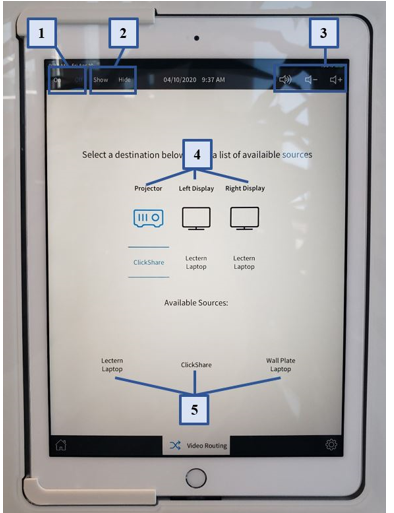
4.) Display There are 3 display options.
a. Projector – This is the main screen and will automatically drop down when the system is turned on.
b. Left Display – This is located at the back of the room on the left side when facing the projector.
c. Right Display – This is located at the back of the room on the left side when facing the projector.
5.) Source There are 3 source options:
a. Lectern Laptop – This is the HDMI connection available on the podium.
b. ClickShare – This option can be requested from the concierge and connects to the USB port on your computer. – Follow steps listed on page 2.
c. Wall Plate Laptop – This plug-in is located under the Right Display screen at the back of the room.
Microphone Options:
There are four microphone options available. One is attached to the podium, and three other wireless options are available at the concierge desk. When turned on, each microphone is automatically connected to the audio output. A green light next to the on/off button on each option indicated the microphone is working.
Steps to connect ClickShare:
1.) On the Panel, ensure the Display is set to ON
2.) Connect the ClickShare USB / USBC-C Device to your device and wait for it to begin blinking.
3.) It will show up like a flash drive does on your PC. Open the device, and run the file called “ClickShare_For_Windows” (Or the ClickShare_For_MacOSX on Mac)

4.) Once the application has finished running, the USB turns to solid white. Press the large silver button on it once to turn it red. Your screen will now be shared.


In order to change the source being show on each display, take the following steps on the IPad.
1. Press the display you would like to change.
2. Press the source you would like to show on that display
3. Wait 3 seconds for the display to show the new source.
2.) On/Off
Pressing the “On” button will make the projector drop down and turn on the audio and video system.
Pressing the “Off” button will make the projector roll up and turn off the audio and video system.
3.) Mute, Volume down, Volume up
Pressing the mute button will stop any audio playing from any source.
The volume up and volume down button will adjust the audio accordingly.